If you use Blogger.com and you used the Blogspot domain then You should need to Set the Custom domain name in Blogger. Blogger is a free platform but you should add some particular Domain name to make a popular and best blog.
A domain name is the main name of your website which helps to find your website in a worldwide web network. It is a necessary element to start a blog and website. Free domain name and custom domain name have a main difference.
Custom domain name Benefits
- You have a better introduction to web search tools. Web search tools (particularly Google) like to connect to root spaces instead of .blogspot.com or .wordpress.com areas.
- You can likewise expand your odds of getting an endorsement for your AdSense account.
- Provided a contact email like username@yourdomain.com as opposed to a Gmail or Yahoo email.
- You can plug your space name effortlessly as opposed to stating a long name.
- Root level areas are much progressively dependable according to clients. In the event that you are attempting to bring in cash blogging, you’ll have a lot simpler time with a custom area than you would with a free sub-space.
Process of Setup a Custom Domain in Blogger
Step-1: After the Purchase of Domain Name, You Should Go to the Blogger.com basic setting.
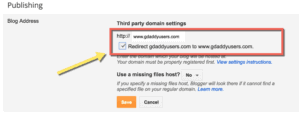
Publishing <> Blog Address <> Click on Setup a 3rd party URL.
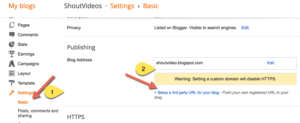
Step-2: Click on setup a 3rd Party Url and add the domain name. You need to add a domain with www as a prefix.
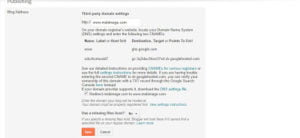
Step-3: Setting your CNAME and A record for Blogspot custom Domain Name.
Go to Godaddy domain name > Go to product> select your Domain Name > Click on Add DNS
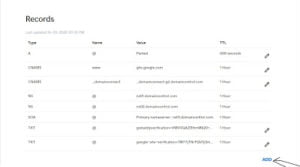
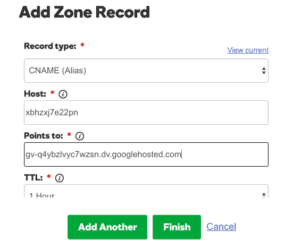
Step-4: Add Zone Record- select CNAME record & add both the record one by one from your BlogSpot setting screen. You can see images-
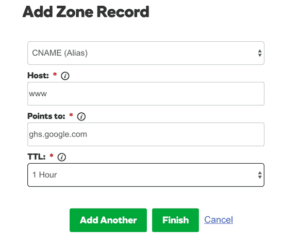
Step-5: Add one more and copy the second CNAME record
Step:6– You need to add 4 I.P. Addresses into your A record.
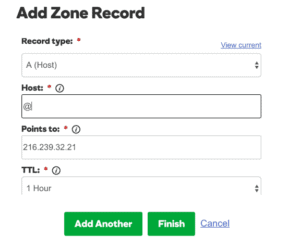
Four I.P. Address like this
216.239.32.21
216.239.34.21
216.239.36.21
216.239.38.21
Step-7: You need to tick on Redirect
After you set all settings. You should wait some time because its process takes time.
Read more… Best Free SEO Chrome Extensions